 Mother Nature is playing a mean trick on us Northerners, but the birds seem unphased; they were singing like it was a sunny spring day this morning. If I closed my eyes, I could almost pretend that it was, ignoring the plop plop of wet flakes hitting the ground. It snowed intermittently all day, and by 6 pm, started up again full tilt. Ten inches predicted by morning. Enough already!
 I stayed home today with a head cold, and being a person who does not rest easily (as in lie down and do nothing) I practiced some tricks of my own.
How do you end your bind off?
When I first started knitting, I would cut a tail and draw it through the last loop remaining on my needle. This always created a loopy end.
 Roberta, a retired employee of the Yardgoods Center in Waterville, and knitting mistress extraordinaire, informed me that this technique actually creates an extra stitch and taught me to just cut my tail and pull that loop. I thought for sure that my knitting would unravel, but it works.
 But, no matter how hard I've tried, I still always get a little wonky loop. Well! I got a hot tip from my Stitch-n-Bitch Page-a-Day Calendar and thought I would share it with you!
You've bound off all but your last stitch, and you have one loop on the right needle and one loop, waiting to be knit, on the left needle.
 Slide the loop from your left needle onto the right. (Sorry for the green fingernail, I had been cutting an avocado).
 Now, insert your left needle into the stitch below, from front to back, picking up the left side of the stitch and sliding it on your left needle.
 Next, slide the last stitch back onto the left needle and then knit both of these loops together.
 You now have 2 loops on your right needle. Pass the second stitch over the first, in the usual manner.
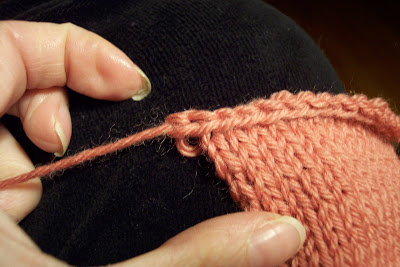
 Look how great it comes out! I found that it comes out better if you keep a neat edge by knitting the first 2 stitches of each row more snugly than usual.
 Here's the bind off I did on the left front of my cardigan, before learning this technique.
 And here's the right front. So much better!
 Speaking of the cardigan, I was working on the button band and scratching my head over the spacing of the buttonholes when I realized that I had picked up 66 stitches instead of the 70 needed for my size.
 It took a lot of number crunching for me to get 66 stitches out of 95 rows. This is how I do it. I'm sure there are other "better" ways to figure this, but it works for me.
 In any case, I'm going to try to block it to fit. If it doesn't work, I frog them both and do the bands again (wahhhhh). Otherwise, all I need to do is block and seam and then I'll be done. In celebration of my near completion, and because it was my sick day, I decided to start Ariann. I really like the Ella Rae (it's much like Patons Classic Wool, though maybe not as soft) and am much happier with the gauge I'm getting than I was with the Cascade 220.
 This pattern is so well written and the lace pattern is very easy to memorize.
 My only criticism is that the pattern does not give instructions for the buttonholes. Now, I've done them a couple of times, but it surprised me that given the thoroughness of the pattern, they were missing. Thankfully, I found these instructions for the one row buttonhole that the designer, Bonne Marie, prefers. I figured it out on my second try, but I'm not really pleased with the result. I think that it's too close to the edge, and I may opt to alternate the cast on stitches to match the knit purl rib instead of the twisted purl cast on. That's over 300 stitches to tink, by the way.
 Despite all of that, I feel good about the sweater. I love the color, which is more accurately shown in the first 2 photos as salmon, rather than tangerine. Hopefully I won't look like paste when I wear it!
By the way, you didn't think I was serious when I said that my little quilt from the Getaway would become another UFO did you?
 A little patch of color to add to my winter weary world. After quilting it, I felt like it needed a little something extra, so I added pearl buttons to the center of the colored blocks.
 The 1930's prints always make me think of spring. So light and cheery. Now, if only Mother Nature would play along!


2 comments:
Thanks for the great bind off tip. I always get that wonky little bump too. I will definitely try it this way next time.
Gorgeous quilt! I love the colors!
Thanks for the tips. I agree, Bonne Marie is always very thorough will her instructions - I noticed it too.
I have about 20 more rows before I have to start thinking about what to do, though.
Post a Comment